This is the easiest room box you will ever make! Especially if you like Raman noodles like I do. I made it for dolls that are about 5 1/2 inches tall; you can see one of them sitting on the bed.
All you need for this project is a Raman Noodle box, some colored Duck Tape (or for the purist among us, Duct Tape), box cutters, fabric, fusible interfacing, and glue. If you want join several boxes to make a simple doll house like above, some large pieces of cardboard will be necessary.
First thing to do is even up the edges of your box with the box cutters, then with the duck tape, tape around each edge. I do this for strength as well as aesthetics - I don't like the raw edge of the box to show.
Next, measure the box for your wallpaper, which is the fabric you chose with fusible interfacing backing it. I only 'papered' the back and side walls, and left the ceiling and floor with the cardboard exposed. Cut your fabric slightly larger than your measurements; you can always trim it to fit.
My chosen fabric (making a library here) and the interfacing. Apply the interfacing to the BACK side of the fabric per the interfacing instructions. Always use a damp cloth when applying interfacing so you don't scorch the fabric.
Next thing to do is to fit your wallpaper to the sides and back of the box. With the edges covered by duck tape, you don't have to make the fabric perfectly flush with the edges. In fact, I let about 1/2 inch of tape show. I hold it in place with clothespins, and measure what needs to be trimmed off.
After you have cut the wallpaper to fit the inside of the box, glue it in place. I do this by using clothespins to hold one side of the fabric to the edge of the box, fit the fabric into the box and crease the corners with the end of a paintbrush. Then, pull back the side of the fabric that is not secured to the box with clothepins and smear glue over the back and sides. I use an old paintbrush after I've applied to glue to spread it thinly but evenly over the surface. Carefully press the fabric into the glue, creasing the corner and making sure you get right to the edge of the fabric on the side wall. Use clothespins to secure the glued section to the side wall, turn the box around and repeat on the opposite side
One side pinned with clothespins, all glued in and ready to pin the other side.
I made three boxes, a library...
a bedroom,...
and a parlor (more like a window seat), then glued them together to make a simple dollhouse. To do this, I placed the library and parlor together and duck taped them on the bottom, back, and top where they joined. I then cut a pieces of cardboard to fit the joined bottom and top and glued this in place.
I added the bedroom to the top of this assembly, glued it to the top and taped it along the back joining.
Once this glue was dry, I cut a larger piece of cardboard to cover the entire back side of the dollhouse and glued it in place.
Back side of the dollhouse
Front side of the dollhouse!
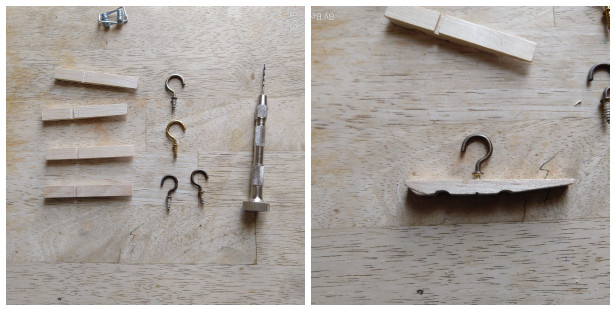
The bedroom has a small closet with four hangers, made from clothespins taken apart and cup hooks
Once the dollhouse or roombox is finished, then you get to decorate! I used two inch foam for the window seat, and just covered it with denim from an old pair of jeans. The rug in the library is crocheted from size 10 cotton; the bed crocheted from sportweight yarn, and the chair in the library from a tutorial on this blog somewhere (this might link you to the tutorial) Any bits of fabric, foam and stuffing can make some easy furniture.
Enjoy your new home!


