Showing posts with label crochet pattern. Show all posts

Wednesday, May 24, 2023

Emma Revisited


 Revisiting the last doll pattern I designed, Emma.  She is worked in worsted weight yarn (I used Red Heart Super Saver in Buff) and has very simple jointed arms and legs.  


Going for more of a Waldorf feel, she has a wig cap made from mohair yarn, which is a bit hard to work with, but makes the most wonderful hair!


You can leave it long, pull it into a single braid, make pigtails or ponytails with it.


In this case, she has double braids.  Her dress and pinafore are adapted from Sandy Nordwall Eggers Spring Dress for Marci available on Ravelry.  I lengthend the dress, and worked the initial lace pattern on the pinafore for additional repeats to make it longer.  Both dress and pinafore are crocheted from Paintbox DK cotton yarn.


Her hat and boots are from the Emma patterns available on this blog.  

Monday, May 22, 2023

Back in business!!!


 After several months of being dead (my blog, not me...), I've resurrected my blog!  From the wasteland that Google left it in (by deleting the website that was hosting my patterns) it rises like a Phoenix to live again!


I've done my best to restore all the pattern links within each post and also the links along the left sidebar.  I may have missed one or two, but they should all work.

Sunday, October 30, 2022

Nightgown and Victorian Undies for Emma and her friends


I am still having a lot of fun playing with this new doll design, Emma.  She is 11 inches tall, with very simple jointed arms and legs.  You can find the pattern for the doll on this blog, a couple posts back.  She is developing a nice wardrobe; today's addition is a nightgown and some Victorian underwear...my favorite to make!


Emma's Nightgown and Victorian Undies


As always, enjoy the crochet!


Tuesday, October 4, 2022

Accessories for Emma, Zoe, and Jennie


On a pattern role with this doll.  She now has some new shoe selections, a cloche cap, and a sweater than can be made as a vest, cardigan, or hoodie!


Accessories for Emma


Enjoy the Crochet!

Monday, October 3, 2022

Tops and Bottoms for Emma and her Friends


 Emma's friends, Jennie and Zoe, have new outfits to wear.  Two different styles of tops, that can be adapted to dresses, and cargo shorts and blue jeans.  The patterns are freely available here to download.


Tops and Bottoms for Emma


As always, enjoy the crochet!

Thursday, September 22, 2022

New outfit for Emma


 A new outfit for Emma, which includes a strapped skirt, underwear, Mary Jane shoes and a sunhat


Emma's New Outfit


Saturday, September 3, 2022

Emma


I got a bee in my bonnet to make a doll with simple joints.  Joints at the elbows, wrist, knees, and ankles.  A doll that did not require lots and lots of stitches to make up.  A simple doll.  So here is Emma, crocheted with worsted weight yarn and a D hook.  Her clothing is sportweight yarn.  She is 11 inches tall and easy to dress.  Her wig cap is simple, and for more wig ideas, please see Sandy Nordwall Eggers pattern on Ravelry:  Cute Hair Styles for Dolls


Emma, A Simple Jointed Doll


Enjoy Emma, and enjoy the crochet!


Sunday, August 7, 2022

Revisiting Crochet Hitty and her clothing


 Having updated Joyce's crochet Hitty pattern, I thought an update on her wardrobe would be a good idea too.  Size 10 crochet cotton was a favorite medium of mine for making small doll clothing, but as my hands get a bit older, and my eyes a bit dimmer, manipulating and seeing the stitches has become less than fun.  And honestly, crochet has to be fun!


Above is an example of crochet Hitty's camisole and petticoat.  On the left, they are worked in DK weight cotton yarn; on the right, size 10 crochet cotton.  There is more detail and better drape with size 10 cotton, but I am happy with the way the DK cotton outfit turned out.  One thing that occured to me as I was making the DK weight outfit:  crochet the petticoat to the last round of the camisole, and reduce the bulkiness at the waistline!

Here are links to both of the patterns:


Camisole and Petticoat in size 10 crochet cotton


Camisole and Petticoat in DK weight cotton


Crochet Hitty also has a tee shirt and overalls in DK weight yarn:


And here is a link:


Overalls and Tee Shirt in DK weight cotton


Coming soon...a full skirted dress and apron pinafore in DK weight cotton.  And if you are wondering what DK weight cotton is, look for cotton yarn that is 50 grams (1.75 ounces) and 125-130m (135-140 yds).  Sportweight falls in this catagory as well.


Enjoy the crochet!

Friday, April 1, 2022

Circle of Love


A Circle of Love.  Tiny dolls that fit snuggly in the palm of your hand.  Someone to tell your hopes and fears to.  This circle of love was made with one skein of Red Heart Super Saver Retro Stripes and all the different Lionbrand Skein Tones yarns.  Twelve skin colors in all.


Doll Pattern by Nelly Lopez:  BHD doll pattern


For the wig caps, you can use the hat pattern that comes with Nelly's doll pattern, just work it to 36 stitches and check the fit, then work without increasing.  To embelish, you can use one of these two patterns to create all kinds of hair styles, or make up your own!

Wig Patterns:  Cute Hairstyles for Dolls, by Sandy Nordwarll Eggers.  Available on Ravelry.

Wig Patterns:  WeeBee Book of Hair, Volume 1 by Laura Tegg.  Avaliable on Etsy.


And if you want to dress your dolls   you can use my free outfit pattern.


Outfits for Nelly's BHD doll:  Outfits, by Beth Webber.


Have a lovely day, and enjoy the crochet!

Saturday, March 12, 2022

Nelly Lopez's BHD pattern, and some clothing for her


I found this adorable doll pattern on a Facebook Group callede Nutshell Lane Studio.  The doll pattern is free, on Nelly Lopez blog.  But I wantede to make her a wardrobe, and it is also free and I will post it here:


Nelly Lopez BHD pattern  links to the doll pattern.  You can use the hat pattern as a wig cap and make all sorts of hair styles.  This doll is Nelly Lopez design.


Outfits for Nelly Lopez BHD doll links to the above clothing.  The clothing are my own designs.


I made my Nelly Lopez dolls with Red Heart Super Saver and a size E crochet hook.  The clothing is made with Paintbox DK weight yarn and a D hook.  The clothing fits up over the feet of the doll and requires no closure, as I used the Foundation Single Crochet to begin each neckline.  This is a very stretchy stitch, and if you are not family with it, you can find many videos by doing a Google search.


My two girls, Onyx and Pearl


Overalls and bibbed jumper


Pinafore dresses


Basic dress, rompers, and sweater


Additional options to basic dress.


Nelly has a lot of other free doll designs on her blog, and outfits for the dolls.  Check it out, and enjoy the crochet!

Monday, February 28, 2022

Ukraine


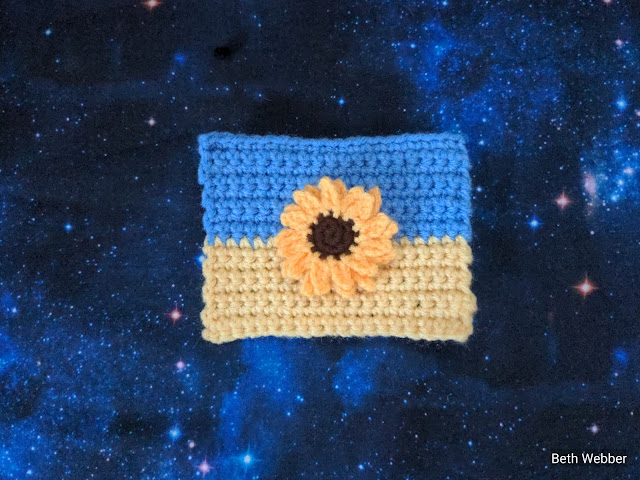
 To honor the people of Ukraine, I created a small crochet flag and sunflower.  Did you know that  Ukraine exports more sunflower seeds than any other country?


The free pattern is available at this link: Flag and Sunflower.


While you make this flag, and sunflower, say a prayer for the people of Ukraine.

Friday, November 27, 2020

The Friday After: toys to crochet for girls and boys


The Friday after Thanksgiving is always a tremendous shopping day.  Having never liked crowds, and perfering to hand make gifts, I've never been a 'black Friday' participant.  In fact, I got to calling it white Friday, as a day to stay home and make something.


Today, black and white take on meanings and nuances that probably have always been with us, so I am going to change it up and refer to today as The Friday After...a day to stay home and make.  So, here are a few patterns from the past that make up quickly and will give you the satisfaction of giving a gift of your hands and heart.  And best of all, the patterns are FREE!


Lets start with Whoever Welcomes a Child the pattern for the doll shown above.  She comes with a set of clothing, and is a mere 3 1/2 inches tall if made with size 10 crochet cotton.  You can size her up, just remeber to use a size smaller thread for her clothing.


One of my favorite patterns is Simply Ami's, which you can crochet in two sizes with light worsted yarn.  There are several clothing patterns for this doll which you can find on the left side menu of this blog.


If you have boys on your list, here are some cute puppie patterns that make up withy worsted yarn:

Beagle

Labrador

Spaniel

German Shepard

Border Collie

and I will sneak in some Kitties as well.

Of course, girls will like them too!


And maybe your intended child would like a wee mouse in their Christmas Stocking!


And last but not least, Three Owls to Crochet:  A Snowy Owl, and Northern Saw-Whet owl, and a Collard Scopes Owl.


All of these patterns, and many, many, more are listed along the left sidebar of this blog.  I hope you enjoy your time making these, and may we work to keep ourselves and our neighbors safe this holiday season.


Enjoy the day, and enjoy the crochet!


Thursday, November 19, 2020

Sweet Ella, Ivy, and Ann


The last couple of months I have been making dolls by two dollmakers:  Carla Vigliucci and LuluCompotine.  Their dolls are similar, and both have extensive, and different, wardrobes.  Both designers use constructions techniques that create beautiful doll bodies.   You can find their patterns here:

Carla Vigliucci on Ravelry

LuluCompotine on Etsy

Since I enjoy 'Frankensteining,' I have taken the techniques I like the most from both of these designers to make Ella, Ivy, and Ann, the three dolls above.  In their bare feet, they are 9 1/4 inches tall.  I used Knit Picks Curio 3 crochet cotton for the dolls and most of their clothing, with mohair and wool yarn for their hair.


These simple dresses are from LuluCompotine, with shoes from Carla Vigliucci.  The sweater is my own design.


The girls wanted nightgowns, so I knit them some.  Thank you to Dawn Smith for the inspiration  to use to the 'long tail cast on,' which creates a much neater neckline, and for the cap sleeve version of the nightgown (Anne in blue is wearing this).  If you are unfamiliar with the long tail cast-on, check out Google and watch some video's.  Once you get the hang of it, it will be your go-to cast-on.

Pattern for the knit nightgowns can be found here...caveat, they have not been pattern tested, so their may be some goofs (almost guaranteed!)

Knit nightgowns 

As always, enjoy the day and enjoy the crochet!

Sunday, October 4, 2020

Doll designs by Carla Vigliucci


For the last few weeks I have been making dolls from the patterns of Carla Vigliucci, which can be found on Ravelry, and Etsy.  Each of her patterns include a doll, anywhere from 7 to 11 inches tall, and at least one if not more simple outfits for her to wear, and a beautiful hair design.

Carla has some unique dollmaking techniques, and I always love learning something new.  How to make a sturdy one piece head/torso, how to eliminate that tiny gap under the arms when crocheting arms into the body, how to make a TERRIFIC pair of shoes.  These are just a few techniques.  And if you are like me and do NOT like sewing parts, these are the patterns for you.

The dolls all have very similar builds, so most of the clothing is interchange-able, or will work with just minor tweaking.  I used size 3 crochet cotton (primarily Aunt Lydia's Fashion 3  and Knit PIcks Curio 3), and a B hook (2.25mm) to make the doll, and a B or C hook for the clothing.

Two other tips to 'up' your dollmaking game.  The Yarn Under Single Crochet: this blog post by Earl Grey Crochet explains this better than any I have found on the internet.  Your crochet fabric will be tighter, and little if no fiberfill will show through.  

The other is the Invisible Single Crochet decrease.  This blog post by Planet June explains the invisible decrease, and it really is!

Here are some of the lovely outfits I made for Elinor, above, who is a combination of Carla's Ema patten, for the body, and Alys pattern, for her hair.


As always, enjoy the day, and enjoy the crochet!

Wednesday, July 8, 2020

Flowers or weeds?


Flowers, or weeds?  My weed garden stitchery!

For at least a couple of years I've had it in my head to create a simple embroidery of the flowering weeds that we see every day...in our yard, along the bike path and against fence rows.  Even in the hotest and driest of summers, these 'weeds' flower with abandon and create impomptue bouquets in the most unlikely places:  through the cracks in the sidewalk or against a railroad trestle.

Most folks do their best to get rid of them, but since they do so very well in all seasons, I think perhaps we chose the wrong flowers to cultivate.  What about a weed garden?  You wouldn't have to do any work at all!  They pop up, and keep on coming, despite our best efforts to the contrary.

So, with a few line images borrowed from the internet (a Google search for weeds and line art), a lightbox to trace the images onto paper and then fabric, some simple embroidery stitches, and finally, a picture!  Chicory, bindweed, dandelions, and thistle.  They are great for pollinators, too.

However, I got bitten by a bug sprite, and now they have taken up residence with my stitchery:


Chicory, Bindweed, Dandelion, and Thistle Twins

These are my weed sprites!  They are from the wonderful Bug Sprite pattern by FantasySpriteStudio on Etsy.  The dolls have a wire armature, the easiest one I've ever seen to do.  My sprites were crocheted with size 10 crochet cotton and armatured with size 20 cotton wrapped wire.   They are about 5 1/2 inches tall.  The pattern calls for fingering or sock weight yarn and 12 to 18 gauge aluminum wire, which makes a sprite about 6 1/4 inches tall.  They are adorable, quick, addictive, posable, and just plain fun to make.

Here are the Thistle Twins, hanging out together!

I highly recommend this pattern, and all of the patterns from FantasySpriteStudio.  Treat yourself to some fun!

Have a great day, and enjoy the crochet!

Saturday, June 13, 2020

Sweet Small Dolls by Sleepy Sheep


Great skin colors in size 3 crochet cotton.  From right to left:  Aunt Lydia's Coffee; Nazli Gelen Garden 3  Medium Brown; Aunt Lydia's Copper; Thread Art #16; Thread Art #02. 

All of these dolls were made from the pattern Joy by SleepySheepPatterns.  Using a size 2.25mm hook (size B) she is about six inches tall before wigging.


With such a small and skinny doll, clothing makes up pretty fast, especially if you use size 3 cotton for the clothing as well.  The pattern comes with a cute dress that can be made either long or short sleeve.  I had great fun creating a 'capsule' wardrobe for this doll; inspired by my friend Dawn Smith and the Tiny Rag Doll Nation on Ravelry making capsule wardrobes for their dolls.


This is Jasmyn, wearing a tee-shirt dress and short sleeved knit sweater; red pants and a white tee-shirt; blue tee-shirt and yellow pleated skirt; and blue tee-shirt and pocket shorts.  A cloche and a sunhat cap her ensembles.


And this is Joy, wearing undies, lacy cap sleeve dress with long sleeve knit sweater, pink tee-shirt and blue jeans.  This hair style is the one that comes with the doll, along with the hair band with the rose.   I made the doll's feet without shoes, so I could change them with her outfits.  The pattern for the capsule wardrobe, that includes all of these outfits, is freely available here:

Joy's Wardrobe

There are a lot of other adorable patterns on SleepySheepPatterns Etsy site.  You should check them out!


Thursday, February 13, 2020

Dollmaking techniques


Another Puddin' doll, by Sandy Nordwall Eggers on Ravelry.  Her outfit is the Spring Boho dress on Sandy's Ravelry site.  Her hair is also one of Sandy's pattern; Cute Hairstyles.

I love this adorable doll, but I also enjoy a little tweaking.  For example, legs that let the doll sit, and a move-able head.  I want to share with you the techniques I use to do this:

Move-able Head


Refer to the above image along with these instructions:

Puddin's pattern is particularly easy to adapt to a move-able head, and it also results in a very nice round head and no wobbles in the neck.
To make the head separate, begin at the bottom of the head and chain 12; join to form a ring, being careful not to twist the chain. Sc in each ch. This will be round 25 of Puddin's head and torso , just finish the head exactly as written, adding eyes and embroidering features as Sandy illustrates. Yes, you CAN stuff the head through this small opening! Hemostats help, but small pliers, or just your fingers will work.


Stuff the head smooth and round, then take your finger and create a cavity opening into the middle of the head. The neck stub will fit up into this.

Crochet the body exactly as written to round 25, then work five more rounds of 12sc. Decrease to eight sc in the sixth round, then stuff this stub firmly and close the top with four sc decrease stitches. This stub will fit into the cavity you made in the head.

Joint the head to the body using two 30 inch strands of strong craft thread (I use Dual Duty button and craft thread). Thread into a dollmaking needle, double and tie a knot in the end. Thread the needle from the top of the head out of the opening in the bottom of the head, making sure you do not catch any of the crochet stitches. Run the needle through the neck stub from shoulder to shoulder, then back into the head and out the top. Tie off the thread with a tight double knot and bury the ends. Now you have a doll with a head that will move and never wobble

Swing Legs

Refer to the above image with these instructions:

These are what I call 'swing legs,' which is an easy adaptation to let your doll sit.

Make the legs as per Sandy's pattern, but after you finish the last row, on both legs, sc in the next five sc. This will put you at the right side of the leg (as you are looking at the leg with the foot facing you). After both legs are finished and stuffed, pinch the top of the second leg together and crochet it closed with six sc, then (making sure the feet are pointing in the same direction!), pinch the top of the first leg you made and sc it closed with six more sc. Your legs are now connected in a line with 12 sc.


To continue with the torso, turn the doll so you are looking at the back side of the doll and single crochet in the front loops of each sc from one end of the back to the other. Turn the doll so you are now looking at the front, and continue to sc in the remaining loops. You will have 24 sc all around the doll, and this will be round 13 of Puddin's torso. Continue with the pattern as written.


Have a great day, and enjoy the crochet!

Update 2/14/2020:  I've created a .PDF file of the above tutorial that you can download:

Swing legs and move-able heads


Monday, August 5, 2019

Bead and Dowel dolls revisited


About a year and a half ago, Joyce and I collaborated on a doll design that used wooden beads for the head, dowel rods for the limbs, and a very simple crocheted body.  The doll was about 5 1/2 to 6 inches tall, and a nice, slender companion to Hitty.  You can find the pattern here:

Hitty bodied peg doll

Some Facebook inspiration got me interested in making a tinier doll, that could stand on her own.  So now, I have another pattern to share, for this little bead and dowel mite.  She stands (on her own!) right at four inches:

Tiny bead and dowel doll

The pattern includes, hopefully, all the tools you will need to make this doll.  In addition, there are patterns for four different wigs made from fingering weight yarn and a size B crochet hook:


And three different outfit plus a sunhat, made with size 8 perle cotton and a size 6 steel hook:


You can use the nightgown bodice or the camisole to make a sundress, and I have some other ideas for outfits in the making.  Here is a list of what you will need to make the doll.  This list looks long, but these are pretty simple tools and supplies.  Hopefully you can get them at your local hobby shop, or if not, they are available online:

Materials, for the doll: 
-An exacto knife for very minimal shaving of the wood dowel and spools
-Small saw and miter box for sawing the dowel rod pieces
-Pin Vise (tiny hand drill) for drilling the dowels to string the limbs to the body.
-200 grit (fine) sandpaper for minimal sanding
-Black paint for eyes and boots
-Pastels in shades of pink for blush
-Modge Podge to seal wood pieces
-Glue
-Toothpicks for painting eyes.
-20mm (3/4inch) wood bead with at least 3/16 inch hole
-One 12” long ¼” diameter dowel rod for body support, arms and legs (will make one doll)
-Two ½ x ⅝ inch spools for boots
-Strong craft thread for jointing the doll’s limbs
-Four  ¼ inch buttons for jointing the doll’s limbs
-Size 3 crochet cotton to make the body
-Size B crochet hook.
-Embroidery needle that will fit through the holes drilled in the dowel rods.

-Craft or carpet thread.


I'll end this post with my favorite picture. I love making dainty undies!